
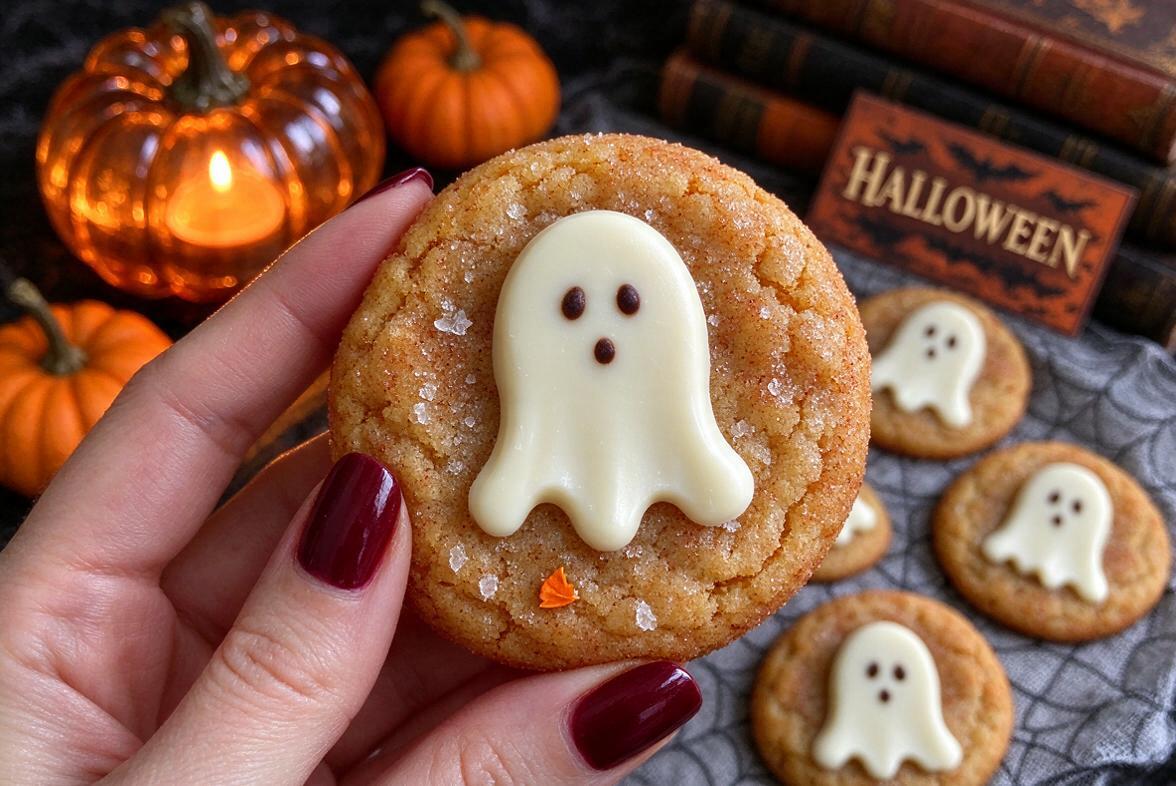
When fall arrives and Halloween is just around the corner, it’s the perfect time to fill the kitchen with the warm aroma of pumpkin, cinnamon, and toasted butter. These Spooky Ghost Brown Butter Pumpkin Cookies combine everything you want in a cozy autumn dessert: soft and chewy pumpkin cookies, rich nutty brown butter, warm spices, and adorable ghost decorations.
The cookies are especially fun because the spooky decoration looks impressive without requiring advanced decorating skills. A simple layer of melted white chocolate can be shaped into little ghosts, then finished with tiny black eyes and mouths.
Table of Contents
Why You’ll Love These Ghost Pumpkin Cookies
These Halloween cookies are more than just a cute dessert.
- Rich brown butter flavor: Browning the butter gives it a toasted, nutty character.
- Soft and chewy: Pumpkin helps create a tender cookie texture.
- Warm fall spices: Cinnamon and pumpkin spice make every bite taste like autumn.
- Easy Halloween decoration: White chocolate ghosts are simple to create.
- Perfect for parties: They look great on a Halloween dessert table.
- Family-friendly: Kids can help decorate the cookies once they have cooled.
Ingredients You’ll Need
For the Pumpkin Cookies
- 1 cup unsalted butter
- 1 cup pumpkin purée
- 1 cup brown sugar
- 1/2 cup granulated sugar
- 1 large egg yolk
- 2 teaspoons vanilla extract
- 2 1/2 cups all-purpose flour
- 1 teaspoon baking soda
- 1 teaspoon baking powder
- 1 teaspoon pumpkin pie spice
- 1 teaspoon ground cinnamon
- 1/2 teaspoon salt
Use pure pumpkin purée rather than pumpkin pie filling, since pie filling already contains added sugar and spices.
For the Ghost Decorations
- 8 ounces white chocolate or white melting wafers
- Black candy melts or melted dark chocolate
- Piping bags or small zip-top bags
How to Make Brown Butter Pumpkin Cookies
1. Brown the Butter
Place the butter in a light-colored saucepan over medium heat.
As the butter melts, it will begin to foam. Continue cooking while stirring occasionally until the milk solids turn golden brown and the butter develops a rich, nutty aroma.
Remove the pan from the heat and allow the brown butter to cool until it is warm but no longer hot.
Tip: A light-colored pan makes it easier to see when the butter solids have reached the perfect golden-brown stage.
2. Mix the Wet Ingredients
Add the cooled brown butter to a large mixing bowl.
Whisk in the brown sugar, granulated sugar, pumpkin purée, egg yolk, and vanilla extract until the mixture is smooth and well combined.
The pumpkin adds moisture while the brown butter provides the deeper toasted flavor that makes these cookies special.
3. Combine the Dry Ingredients
In a separate bowl, whisk together the flour, baking soda, baking powder, pumpkin pie spice, cinnamon, and salt.
Mixing the dry ingredients separately helps distribute the leavening agents and spices evenly throughout the dough.
4. Make the Cookie Dough
Gradually add the dry ingredients to the pumpkin mixture.
Stir gently until a soft dough forms. Avoid overmixing, as this can make the cookies less tender.
For thicker, chewier cookies, refrigerate the dough for about 30 to 60 minutes before baking. Chilling cookie dough can help reduce spreading and improve the final texture.
5. Scoop the Cookies
Preheat the oven to 350°F (175°C).
Line a baking sheet with parchment paper.
Use a cookie scoop or tablespoon to portion the dough onto the prepared baking sheet, leaving enough space between each cookie for spreading.
6. Bake
Bake the cookies for approximately 10 to 12 minutes, or until the edges are set while the centers still look slightly soft.
Don’t wait for the cookies to become completely firm in the oven. They will continue to set as they cool.
Allow them to rest on the baking sheet for several minutes before transferring them to a wire rack.
How to Make the Ghost Decorations
The ghost topping is what transforms these ordinary pumpkin cookies into a Halloween dessert.
1. Melt the White Chocolate
Place the white chocolate in a microwave-safe bowl.
Heat it in short intervals, stirring between each one, until completely smooth.
Avoid overheating the chocolate because excessive heat can cause it to become thick or difficult to pipe.
2. Create the Ghosts
Make sure the cookies are completely cool before decorating.
Spoon or pipe a small amount of melted white chocolate onto the center of each cookie.
Using the back of a spoon, gently drag the chocolate downward to create a simple ghost-like shape. You can make the bottom slightly wider to give each ghost a flowing appearance.
Another easy method is to pipe the white chocolate directly into a ghost silhouette.
3. Add the Faces
Melt a small amount of black candy melts or dark chocolate.
Transfer it to a piping bag with a very small opening.
Add two tiny dots for the eyes and a small oval or dot for the mouth.
Don’t worry about making every ghost identical. Slightly different expressions make the cookies even more fun.
4. Let Them Set
Allow the decorations to harden at room temperature for about 15 minutes.
If you’re in a hurry, place the cookies in the refrigerator for a few minutes until the chocolate is firm.
Tips for Perfect Brown Butter Pumpkin Cookies
Don’t Burn the Butter
The difference between beautifully browned butter and burnt butter can happen quickly. Keep an eye on the pan once the butter starts turning golden.
Cool the Brown Butter
Don’t mix piping-hot butter directly with the other ingredients. Let it cool first so it doesn’t negatively affect the dough.
Use Pure Pumpkin Purée
Pure pumpkin purée gives you control over the sweetness and spices in the recipe.
Chill the Dough
If your cookies spread too much, chilling the dough can help them maintain a thicker shape.
Don’t Overbake
For soft, chewy cookies, remove them when the edges are set but the centers still look slightly soft.
Decorate Only After Cooling
White chocolate can melt or slide if placed on hot cookies. Always allow the cookies to cool completely before decorating.
How to Make the Ghosts Extra Cute
There are plenty of ways to customize your Halloween cookies.
Different expressions: Give some ghosts happy faces, surprised faces, or sleepy eyes.
Candy eyes: Replace the chocolate faces with tiny candy eyes.
Colored chocolate: Use orange, purple, or green melting wafers for a colorful Halloween platter.
Sprinkles: Add Halloween sprinkles around the ghost decorations while the chocolate is still soft.
Pumpkin spice: Add a little extra cinnamon or pumpkin spice if you want an even stronger fall flavor.
What to Serve With Ghost Pumpkin Cookies
These cookies pair beautifully with cozy fall drinks.
Try serving them with:
- Hot chocolate
- Apple cider
- Pumpkin spice latte
- Coffee
- Chai tea
- Warm milk
For a Halloween party, arrange them on a dark serving platter surrounded by mini pumpkins and other seasonal decorations.
How to Store Them
Once the chocolate decorations have completely hardened, place the cookies in an airtight container.
Keep them at room temperature for several days.
For the best texture, avoid stacking them until the ghost decorations are fully set. If you need to stack them, place parchment paper between the layers.
Can You Freeze Pumpkin Cookies?
Yes. The undecorated baked cookies can be frozen in an airtight container.
Allow them to cool completely before freezing and separate layers with parchment paper.
When you’re ready to serve them, let the cookies thaw at room temperature and decorate them afterward.
Freezing the cookies before decorating is the easiest option because the white chocolate ghosts are less likely to crack or become damaged.
Frequently Asked Questions
Can I use pumpkin pie filling?
It’s better to use pure pumpkin purée. Pumpkin pie filling already contains sweeteners and spices, which can change the flavor and texture of the cookies.
Why did my cookies spread?
Warm butter and unchilled dough can cause cookies to spread more. Chilling the dough before baking can help produce thicker cookies.
Can I use royal icing instead of white chocolate?
Absolutely. Royal icing works well for creating ghost shapes and allows you to pipe more detailed faces.
Can I make these cookies without brown butter?
Yes, but browning the butter adds the distinctive nutty, caramel-like flavor that makes these pumpkin cookies especially delicious.
How do I prevent the ghost chocolate from cracking?
Make sure the cookies are completely cool before decorating, melt the chocolate gently, and allow the decorated cookies to set without moving them.
Final Thoughts
These Spooky Ghost Brown Butter Pumpkin Cookies bring together the best flavors of fall with a playful Halloween twist. The browned butter adds a rich, nutty depth, pumpkin keeps the cookies tender, and warm spices make them irresistibly cozy.
The ghost decorations are simple enough for beginners, making these cookies a fun baking project for the whole family. Whether you’re preparing a Halloween party, a fall bake sale, or simply looking for a festive dessert to enjoy at home, these adorable pumpkin cookies are sure to disappear quickly.
Bake a batch, decorate your little ghosts, and let the Halloween fun begin!